Bambino-210 Manual/Appendix B
From Manuals
(Difference between revisions)
(→Appendix B - Using an External JTAG with the BAM210) |
(→Appendix B - Using an External JTAG with the BAM210) |
||
| Line 14: | Line 14: | ||
|'''Signal''' | |'''Signal''' | ||
|'''LPC4330 PIN NAME''' | |'''LPC4330 PIN NAME''' | ||
| - | |''MBED ALIAS''' | + | |'''MBED ALIAS''' |
|- | |- | ||
|USBTX | |USBTX | ||
|P2_10 | |P2_10 | ||
|USBRX | |USBRX | ||
| - | |||
|- | |- | ||
|USBRX | |USBRX | ||
Revision as of 13:03, 7 October 2014
Appendix B - Using an External JTAG with the BAM210
- 1. Locate the LPC11U35 Virtual COM Port Binary
- 2. Boot the MBED HDK into CRP DISABLED mode by shorting JP3 while connecting the USB Cable to USB1. A
 drive should appear.
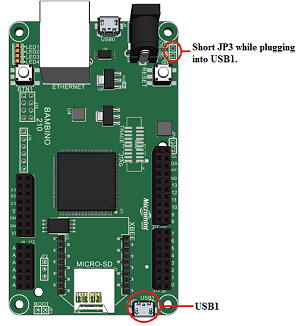
- 3. Program the Interface firmware by deleting the firmware.bin file and copy lpc11u35_vcom.bin to the CRP DISABLED disk.
- 4. Reboot the Interface by disconnecting and reconnecting the USB1 cable without JP3 shorted.
- 5. Finished!

The JTAG connector now free to use with an external JTAG. A virtual COM port is now available to use on USB1.
The signals used for LPC4330 and the virtual COM port are listed below:
| Signal | LPC4330 PIN NAME | MBED ALIAS |
| USBTX | P2_10 | USBRX |
| USBRX | P2_11 | USBTX |